Site search |
How to bake a simple birthday cake
Previous
|
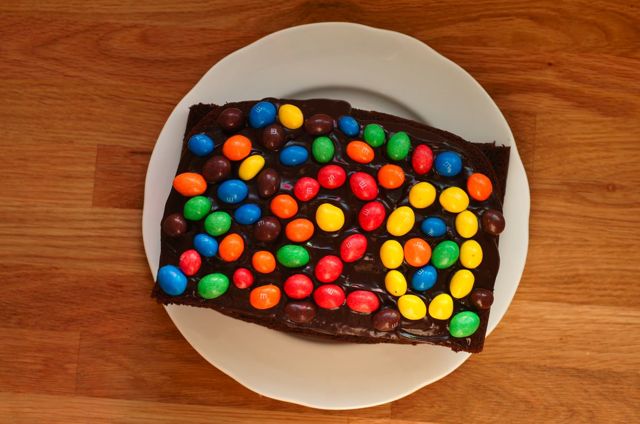
 In her new series for students our new contributor Emma, who blogs as Poires au Chocolat, shows how to make a simple, delicious birthday cake for your friends. In her new series for students our new contributor Emma, who blogs as Poires au Chocolat, shows how to make a simple, delicious birthday cake for your friends."Some of my fondest student memories revolve around birthdays and the cakes I baked and received. I treasure a snapshot of a friend who was legendary for his lack of interest in cooking using tweezers to place silver balls on top of my cake so they were ‘just right’. Without mum or another family member to make a cake, a birthday in term time can feel a bit empty. A homemade cake fills the gap and is sure to make your friend feel special. You can get a few friends together and make the baking an event too. For this sort of occasion, I think simple and crowd-pleasing is best. Though I love experimenting with flavours and designs, I’d hate for someone not to like a birthday cake. I usually stick to chocolate, vanilla or a combination. I’ve written recipes for vanilla cake, chocolate cake, a vanilla cream cheese icing and a milk or dark chocolate icing so you can mix and match. As far as budget goes, making a cake doesn’t have to break the bank. You can give the cake in place of another present and/or you can split the bill with your friends. I did a quick price check and you could buy all the ingredients from scratch for the vanilla cake with vanilla icing for about £8 – and that’s without you having a few eggs or some flour waiting in your cupboards. Any of the cake combinations should cost less than £10. Serving portions of cake are difficult to judge but I would say both cakes serve 8-10 with a medium/small sized slice.  I like to decorate birthday cakes with chocolates. Find out or guess which chocolate bar or button is their favourite and buy a packet or two. Use your imagination and place them around or on top of the cake, slicing up anything huge or thick. You can also use smaller chocolates to form a number or initials. I like to decorate birthday cakes with chocolates. Find out or guess which chocolate bar or button is their favourite and buy a packet or two. Use your imagination and place them around or on top of the cake, slicing up anything huge or thick. You can also use smaller chocolates to form a number or initials.If you don’t fancy making icing, you can buy chocolate spread, jam or lemon curd to use instead. A dusting of icing sugar on top works if you only want to fill the middle. I’ve tried to minimise specialist equipment as far as possible. I’ve listed what you do need above each recipe so you can find, buy or borrow everything before you start. I’ve tested a few different cake tins to try and make things easier. Both recipes can be baked in two sponge tins (7”/18cm), one larger tin (8-9”, 20-23cm) or a clean roasting tin of approximately 10x12”/30x25cm. So you don’t need to buy greaseproof paper both recipes will be fine with a greased tin. You can split the cake in two horizontally for a circular tin or into two rectangles for the roasting tin. You can trim the roasting tin edges if you like – trimmings are the cook's treat! Before you start, make sure that the butter and eggs have been out of the fridge for at least 30 minutes. Measure the butter and cut it into cubes to speed things up. It needs to be very soft – not so that it is oozing or melting, but so that you can easily squish a cube by lightly pressing on it. Don’t worry if it looks a bit messy – birthday cakes are all about tasting good and the effort you’ve put in. And don't forget to find a clean plate to put it on and buy some candles!"  Vanilla Cake Vanilla CakeThis is a basic all-in-one sponge cake. If you have an electric whisk it will make the job easier but it’s perfectly possible with a spoon and a touch of muscle. Though I really recommend using butter for the taste you can also use margarine in this recipe – try to get a baking-specific one such as Stork. Equipment: Scales Baking tin – two 7” (18cm) circular tins, one 8” or 9” (20-23cm) circular tin, or a 12”x10” (30 x25 cm) or similar roasting tin Sieve OR fork Mixing bowl Electric hand whisk OR spoon Ingredients: 165g self raising flour 1 level teaspoon baking powder 165g butter or margarine, cubed and very soft 165g caster sugar 3 large eggs, at room temperature 1 teaspoon vanilla extract A little extra butter and flour to grease the tin Method: Preheat the oven to 170°C. Grease your chosen tin(s) with a little extra butter, making sure you cover the entire surface. Sprinkle in a little extra flour and tap around so it covers the butter. Either sieve the flour and baking powder into the mixing bowl or tip them into the bowl and then whisk a little with the fork to break up and lumps and combine the two. If you have an electric hand whisk: Place all the ingredients into a mixing bowl and whisk for 1 minute until totally combined. If you don’t have an electric hand whisk: Place the butter/margarine into a mixing bowl with the sugar. Beat with a spoon, squishing them together, until totally combined and smooth. Add the rest of the ingredients and beat till there are no lumps. Spoon the mixture into the tin(s) and spread it evenly into the sides. Check the oven is up to temperature then place the tin(s) in the middle of the oven. Bake for 20 minutes for 2 cakes or a roasting tin, 30 minutes for one deeper tin. The cake should be golden brown, spring back when you touch the surface in the middle and a toothpick or thin skewer should come out clean if you prick the cake in the centre. Turn out of the tin(s) to cool after a few minutes (a wire rack is best, but you can just carefully slip it out onto a plate). (Recipe adapted from Delia Smith’s Book of Cakes.) ***  Chocolate Cake Chocolate CakeDon’t worry, you can’t taste the coffee in this recipe - it acts as a flavour booster for the chocolate. If you would rather not use it, a teaspoon of vanilla extract will also work well. If you have an electric hand whisk then just follow the recipe as normal, using it instead of the spoon. Equipment: Scales Baking tin – two 7” (18cm) tins, a 8” or 9” (20-23cm) single tin or a 12”x10” (30 x25 cm) or similar roasting tin Mixing bowl Spoon (wooden or normal cutlery spoon) Sieve OR fork and extra bowl Mug Ingredients: 180g unsalted butter, cubed and very soft 200g caster sugar 1 teaspoon instant coffee 1 tablespoon boiling water 200g plain flour 1 level teaspoon baking powder 1/2 teaspoon bicarbonate of soda 40g cocoa powder 2 large eggs, at room temperature 150g sour cream/full fat Greek (or Greek style) yogurt A little extra butter and flour to grease the tin Method: Preheat your oven to 180°C. Grease your chosen tin with a little extra butter, making sure you cover the entire surface. Sprinkle in a little extra flour and tap around so it covers the butter. Place the soft butter into the mixing bowl and add the sugar. Use the back of the spoon to squish them together and combine the two. Beat them together a little bit until the mixture is creamy and soft. Mix the instant coffee and boiling water together in a cup. If you have a sieve, place it over the mixing bowl and sieve the flour, baking powder, bicarbonate of soda and cocoa powder through it. OR if you don’t have a sieve, place the same ingredients into another bowl and mix together with a fork, trying to get rid of any little clumps, then tip into the mixing bowl. Add the egg, sour cream/yogurt and coffee mixture to the mixing bowl on top of the flour. Beat all the ingredients together with the spoon, starting carefully so the flour doesn’t go everywhere, until the mixture is smooth. Spoon all of your mixture into the tin and smooth it out into an even layer, right up to the corners. Place the tin into the pre-heated oven (check it is up to temperature before putting the cake in). Bake for 22-25 minutes or until ready. Test by pressing the cake lightly in the centre - it should spring back up instead of denting - and a small skewer/toothpick inserted in the middle should come out clean. (Recipe adapted from Nigella Lawson’s Feast.) ***  Chocolate Icing Chocolate IcingThis icing is a chocolate ganache, a mixture used in varying ratios to make truffles, icings and other delicious items. Though it’s actually quite simple, people tend to find ganache impressive and it tastes amazing. Because there are only a few ingredients, the taste of the chocolate you use is noticeable. As a result, it can be a good place to splash out on a nice bar or a brand you know your friend likes. You weigh the cream so you don’t need any volume measuring equipment. Equipment: Scales Knife and chopping board Medium bowl Small saucepan Wooden spoon Whisk/Fork Ingredients: 100g dark or milk chocolate 100g double cream 15g caster sugar (if using dark chocolate) Method: Weigh the chocolate, then chop it up into small chunks (each square roughly in half) and place in a bowl. Put on the counter near your hob/stove. Put the cream into a clean small saucepan. Add the sugar if you’re using dark chocolate. Put on a medium heat. Watch the cream until it starts to steam and form little bubbles, stirring occasionally. When it’s ready take the pan off the heat then pour the cream over the chocolate, making sure all the pieces are covered. Leave for 1 minute then use a small whisk or a fork to whisk the mixture until it is smooth and glossy. Cool for 5 minutes. If the mixture seems a bit thin and drippy, place in the fridge for 10 minutes or more to firm up. Spread half of the mixture over the bottom half of the cake. Place the other half of the cake on top, and then spread the rest over the top surface. ***  Cream Cheese Icing Cream Cheese Icing I love pairing cream cheese icing with cakes – the slight tang helps offset the pure sweetness. It works well with either the chocolate or vanilla cake (or a carrot cake). Make this icing before you start on a cake – it needs some time to firm up in the fridge. Equipment: Scales Medium bowl Spoon Whisk Ingredients: 1x 200g tub of cream cheese (e.g. Philadelphia), at room temperature 50g butter, very soft and chopped into small pieces 150g icing sugar Method: Place the cream cheese in a bowl and beat with a spoon until it is smooth. Add the butter and beat that in until smooth. Use a whisk to even out any last pieces of butter. Add 1/3 of the icing sugar and whisk in until smooth. Add the next 1/3, combine and repeat with the final 1/3. Make sure the mixture is smooth. Place in the fridge to firm up for 1 hour. Spread half over the middle of your cake, and half on top. *** You can find more delicious (though admittedly more challenging) recipes on Emma's blog Poires au Chocolat. |


